In a perfect world every print job would run with ease – the third job running the same as the first and the second. However, in reality, problems can – and do – arise, owing to multiple potential factors. But how do you know if the problem is caused by the ink, substrate, equipment or a combination of these?
The following article aims to highlight and troubleshoot some of the most common issues that come up.
Issue: The ink adheres to some areas of the substrate but not others.
Troubleshoot: The first thing to check when printing on polyethylene or polypropylenes is the dyne level of the substrate in multiple areas. If a piece of substrate has a surface tension of 45 dynes in the right hand corner that does not mean the surface tension in the middle is 45 dynes. So what causes dyne levels to decline? Dyne levels in substrates can be affected by heat, humidity, chemical contamination and substrate age. The way to check a substrate’s dyne level is by using dyne testing solution or pens.
You can treat a substrate with low dyne levels by flame or corona treating the print surface of the substrate. If an acceptable dyne level cannot be achieved by flame or corona treatment, the substrate may be past its shelf life and has become unprintable.
Vinyl substrates are known for plasticiser migration or plasticiser diffusion. Plasticisers are additives that give vinyl substrates flexibility and reduce brittleness. Plasticiser migration happens over time in a vinyl substrate as the plasticiser comes to the surface of the substrate. This may look like a waxy or oily substance on the surface of the vinyl.
The way to treat a substrate with plasticiser migration is to wipe the substrate with isopropyl alcohol (IPA). Wiping with IPA will remove the plasticiser residue from the substrate surface, making the substrate printable again. If a large amount of plasticiser has penetrated the surface of the vinyl, after wiping the substrate with IPA, check for signs of brittleness as the vinyl may be past its shelf life.
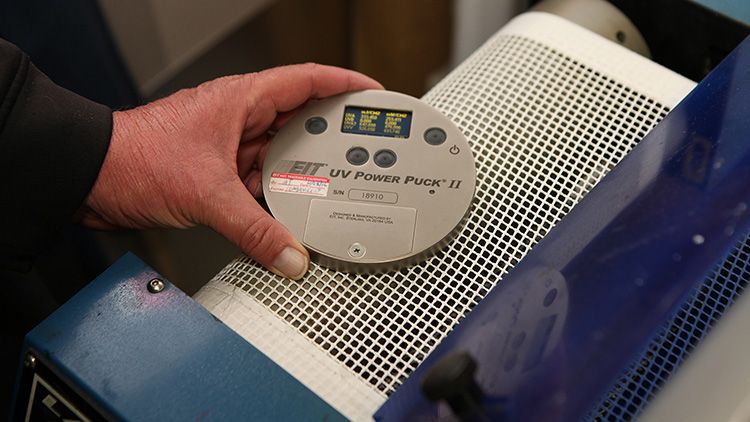
If the dyne levels are fine, the cause of the issue could be cure-related. Firstly, check the output of the UV lamp with a radiometer. This should be done in three different sections of the bulb (left, middle and right). Issues with a UV lamp not emitting enough energy can include the bulb sagging in the middle causing the reflector to not properly focus the light; a dirty reflector; an old bulb not emitting enough energy; or a bad ballast.

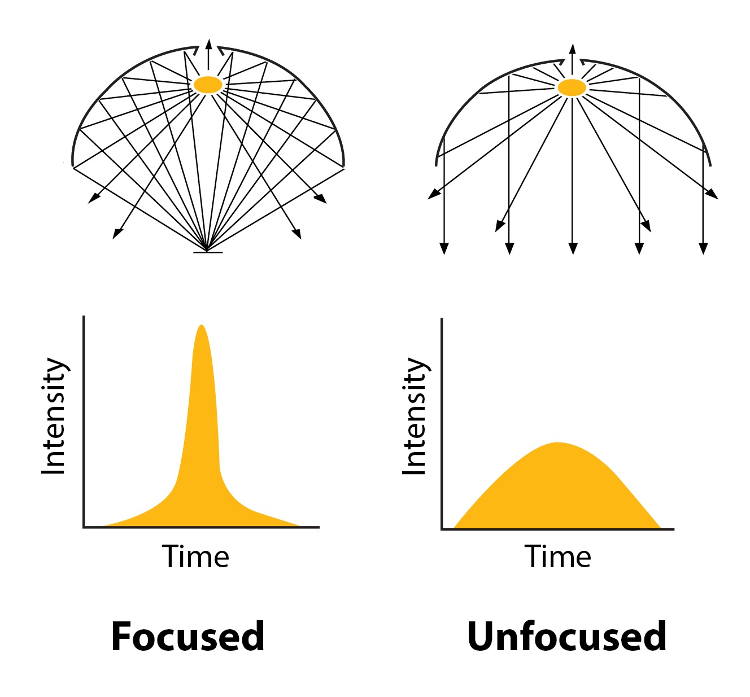
A radiometer that shows the light curves is the best way to troubleshoot UV reactor issues. The light curve should come to a peak as represented in the image labelled “Focused” in Figure 1. If the curve does come to a peak but there is low output, change the bulb to see if that helps. If it doesn’t, the ballast in the lamp housing may be faulty and may need replacing. You might consider asking an electrician to check the energy output of the ballast to determine if this is the issue.
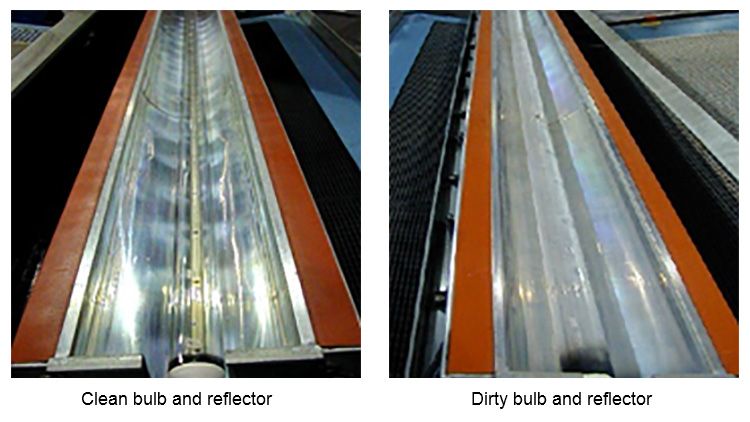
If the curve is slow and gradual, as in the image labelled “Unfocused” in Figure 1, it means that the light is not focused. The fix for this may be as simple as cleaning the bulb and reflector. The picture below shows a comparison between a clean bulb and reflector and a dirty one.

Issue: Ink does not stick to the first layer of ink, or the second layer of ink is tacky.
Troubleshoot: Both issues go hand in hand, and most of the time it is because the first layer of ink was not cured or dried properly. First check the initial layer of ink by doing a thumb twist on the ink surface. If it smudges easily then the ink is not properly cured or dried.
For UV inks, the UV reactor may need to be turned up to a higher output setting or the belt speed may need to be slowed down. Also checking the UV output is a good idea if the ink was curing on a previous run at the same settings. Keep in mind that darker colours and highly pigmented inks will need more energy for proper cure.
For conventional inks, the bake cycle may not be hot enough or there might not be enough air circulation to properly remove the solvent. With conventional air-dry inks, the dry time may need to be adjusted due to seasonal changes. Thicker ink deposits will need additional time to properly evaporate the solvents from the ink film.
In some cases, additives such as a catalyst can cause this issue. The catalyst will create a harder ink surface that can be difficult for other layers of ink to adhere to. Adding the additive or catalyst to all ink layers has shown to alleviate this problem in some cases.
Reducing the amount of time between printing multiple layers is also a good idea. UV inks will continue to cross-link over time. If too much time elapses between ink layers, the ink may have crossed-linked to such a hard surface that it will no longer accept ink.
Solvent inks can also cure to a level that becomes too hard. Solvent inks can be tricky when it comes to timing the next layer. You don’t want to wait too long – however you want to make sure that most of the solvent has evaporated. If a layer of solvent ink is printed before the underlying layer has dried, it could cause improper laydown, adhesion or drying of the top layer as you are trapping solvent in the underlying layer.
Issue: Ink is curing/drying in my screen.
Troubleshoot: UV ink can react to any source of light-emitting UV rays. This includes windows, overhead lighting and light escaping from the UV reactor. Overhead lighting may need a filter cover. If the light is coming from the UV reactor, contact the equipment manufacturer to see if they have a cover or filter for the reactor.
Adding a slow evaporating thinner or retarder to a conventional ink will help slow drying in the screen. Only enough ink to print for ten minutes should be added to the screen at one time and fresh ink should be added frequently during the print run.
Scooping ink that has made its way to the side of the screen back into the print area periodically is a good way to keep stagnant ink from drying or curing. Covering the print screen during breaks is also a good practice for UV inks and keeping the screen flooded helps keep fine areas in the screen from getting clogged.
Issue: Ink is causing my squeegee to swell and or degrade.
Troubleshoot: Squeegees have pores and the more often you use them the more those pores can swell and become susceptible to solvents. Rotate squeegees often. Once you have cleaned the squeegee with solvent you should allow a day for the squeegee to recover. Another good practice is to wipe the ink off the squeegee when idle.
Not all squeegee material is appropriate for UV printing or conventional inks with aggressive solvents. Make sure the squeegee you are using is a robust solvent-resistant squeegee.
Issue: Inks are causing eye, nose or throat irritation.
Troubleshooting: Most commonly this is caused by poor air circulation. Solvent inks dry by solvent evaporating from the ink film. It is very important to have good airflow when printing solvent ink to remove the solvent from the workplace air.
UV inks have little to no volatile organic compounds. However, they can still release substances such as photo initiators that can cause irritation to the skin, eyes and throat. Therefore, good air circulation is needed even with UV inks. Just moving the air is not sufficient; removing the air and circulating fresh air into the workplace will alleviate irritation most of the time.
Skin irritation is more common in the summer months when temperatures rise. This is because the heat opens the pores of your skin and sweat can trap solvent and allow it to stay in contact with the skin. Frequent washing of the exposed skin with soap and water should help calm the irritation, and – it goes without saying – users should be mindful to avoid direct skin contact with solvents and chemicals.
Issue: Black and white UV inks cure fine, but I cannot cure a grey mixing the two.
Troubleshooting: This issue is called windowing. White inks block a certain wavelength of the UV light output and black inks block another set of wavelengths. When the two colours are mixed, then the UV light output needed to cure the ink is blocked by both colours and can cause curing issues.
Using mixing clear to reduce the opacity of the grey can help UV energy penetrate the colour and cure the ink. Using colours other than black can also help poor cure.
Issue: Ink is cracking when the substrate is bent.
Troubleshooting: This can be caused by a few issues. The first thing to check is the substrate surface. There may be micro cracking in the surface of the substrate even before ink is applied. If the substrate is cracking, more than likely, the ink will crack along with the substrate.
If the substrate looks good, then check if the correct ink is being used, specifically if it has been designed for rigid substrates. Inks designed for rigid substrates will often have hard surface cure properties which will equal poor flexibility.

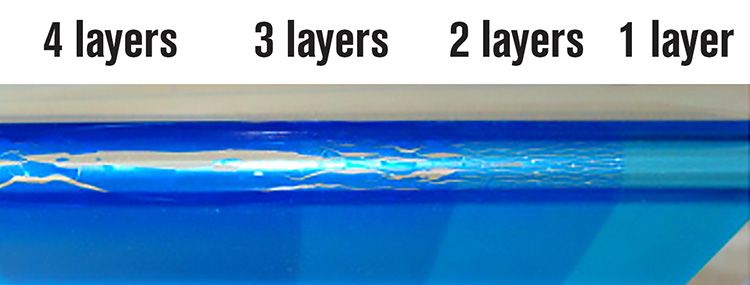
If the proper ink is being used and is cracking, the problem may be too many ink layers. The least amount of ink layers will be the most flexible as shown in Figure 2.
Using a finer screen mesh or adding thinners or reducers to create a thinner ink deposit can help cracking issues. There may be a flexibiliser additive that can be added to the ink. This should be the last resort as flexibilisers may cause blocking, scuffing or cure issues.
These are just a few issues that can come up in a print run that can be resolved if you know what to look for. Understanding the relationship between substrate, ink, processing and final application is a great way of creating a successful print from start to finish.
Contact your substrate or ink supplier’s Technical Support Team for more information on these and other issues. Nazdar’s Technical Support can be reached at www.inkanswers.com.
For more information on Nazdar and its comprehensive range of ink solutions, please visit www.nazdar.com.
Co-written by Terry Kimrey, Nazdar Market Segment Manager – Screen Products; and Steve Noland, Nazdar Technical Support Lead.


